Well, there is certainly no shortage of advent calendar ideas swirling around Pinterest. There are some amazing ideas out there! So, I felt the need to make my own contribution with our Lego Duplo 2013 advent calendar. I think it’s hysterical! As a bonus, you don’t really need to posses any major crafting skills for this one folks…a little cutting and writing…that’s it!
…
diy
Mini Pilgrim Hat Piñata…
Who says you can’t have a piñata at Thanksgiving? Not me…that’s for sure! You know I love a mini piñata! Inspired by my mini leprechaun piñatas, these little guys are a fun way to celebrate Thanksgiving.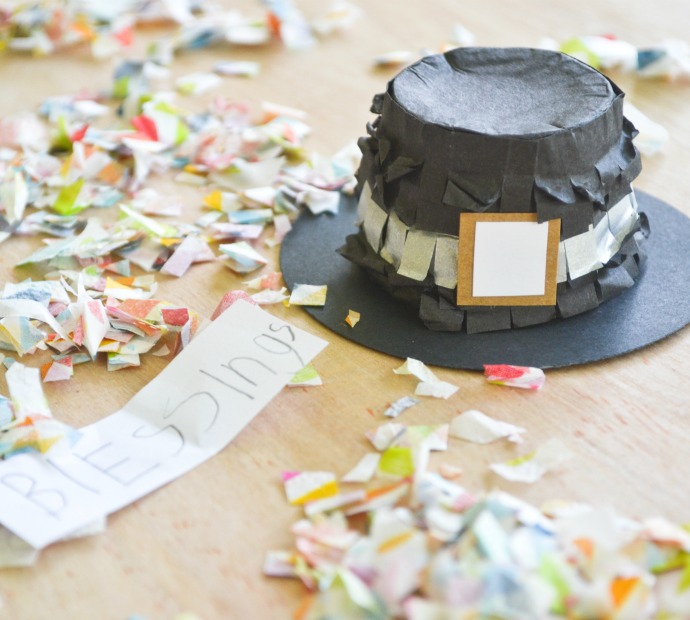 …
…
Handmade Kid Stationary…
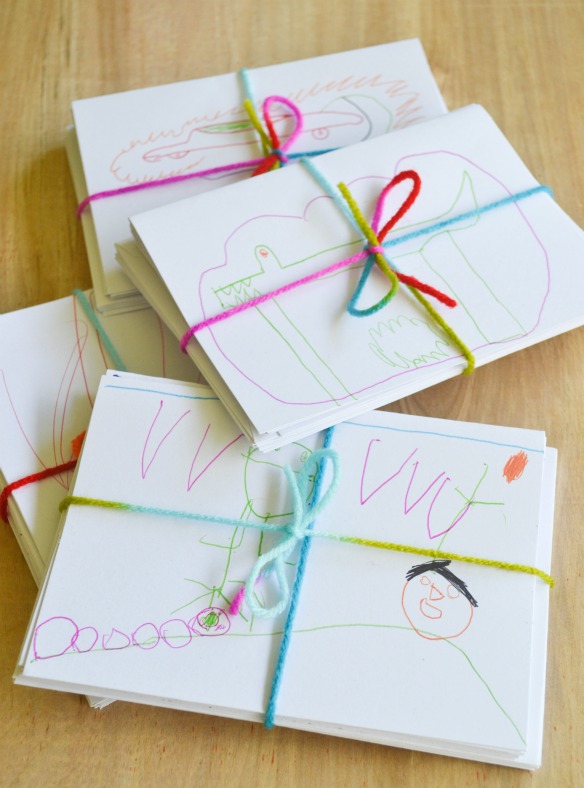 I still prefer getting cards and handwritten letters over emails, texts, tweets, or Facebook messages. I have saved many letters over the years. I kept every letter my husband and I wrote to each other, before we ever even met almost 20 years ago. I’ve gone through the box a few times and it brings back such great memories of such a different time in our lives. I have saved countless letters from my bestie…all dating back to High School. We got in sooo many fights…and she was so dramatic! Love that I still have these….
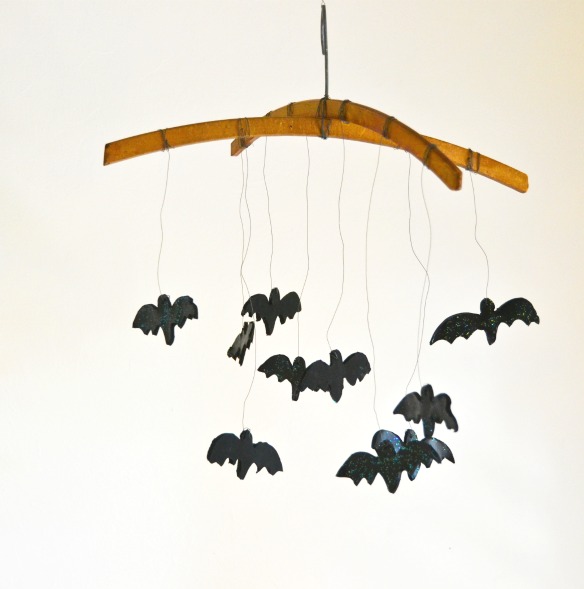
Bat Mobile…
Halloween is less than a week away and I just put out our first decoration. Ha. Well, it’s an improvement from last year, when I didn’t put anything out until Halloween night. I used to be so on top of this stuff. Times…they did a change! Also, I find it funny how my tastes have changed since having kids. Pre-kid I would have much preferred store bought decor, but now, I prefer homemade all the way. Maybe it’s because I’m a homemade type of gal..I dunno. There is always something so charming about homemade, that store bought could never replicate.
I picked up a bunch of vintage hangers for $1 at a thrift store a few weeks back. I wasn’t really sure what plans I had for them, but I liked their shape and there’s the whole $1 thing. So, I bought them and do what I always do. Toss it in my never ending “to do” craft pile and wait for inspiration to strike.
Inspiration struck today and I decided we needed some Halloween decor. I busted out the craft supplies and we made this little bat mobile. I do love it!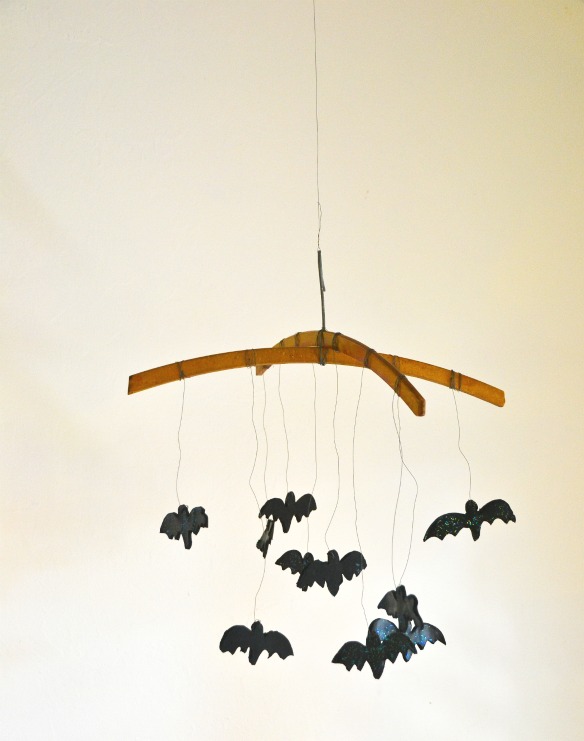
 Gather your supplies:
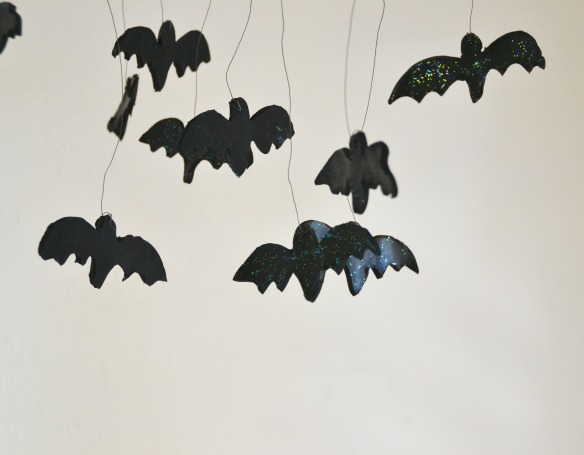
Sculpey oven bake clay
Toothpicks
Acrylic glitter paint
Bat template
Floral wire
Rolling pinHangers or dowel rods
Drill
Instructions:
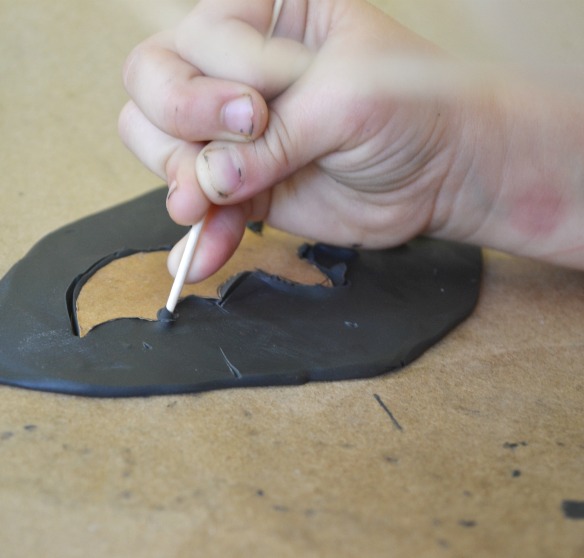
Roll out clay to approximately 1/8 in thickness.
Place bat template onto clay.
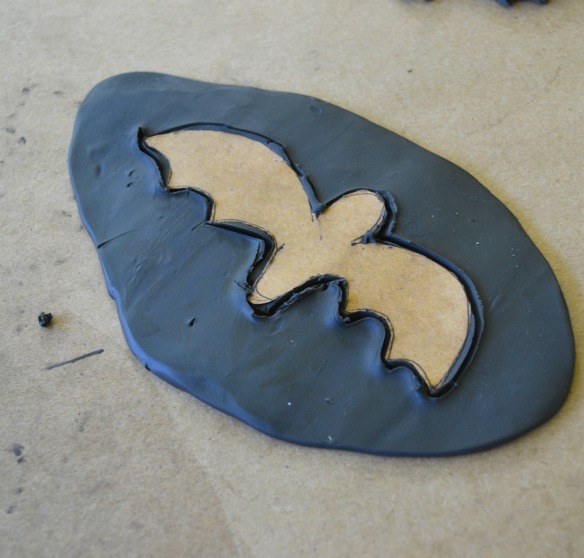
With a toothpick cut around template.
Remove excess clay and template.
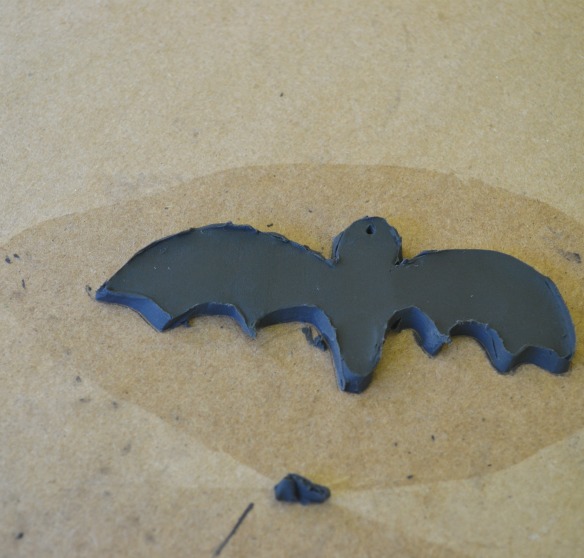
Make a hole in center of head with toothpick.
Bake according to directions.
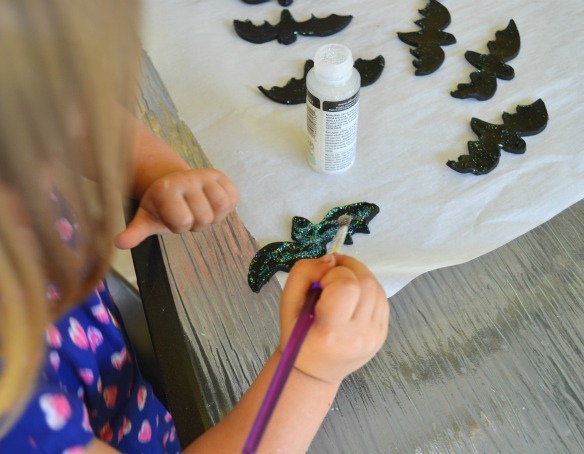
Once cooled, coat with glitter paint and let dry.
Thread bats with floral wire and attach to hangers or dowel rods.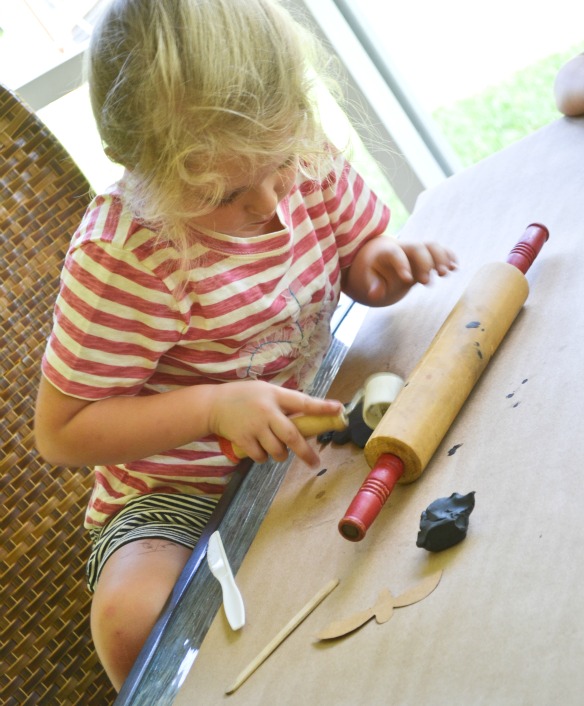

 For the hangers, I had my husband remove one of the metal hanger part things. Then, he straightened the remaining hanger and threaded it through the the bottom of the other hanger. Next, he bent it back into a hook shape. After he drilled holes, I wrapped some floral wire around the center of the hangers to keep them in position. If you don’t have any wooden hangers, wooden dowel rods would work just as well. You can get those from any craft or hardware store.
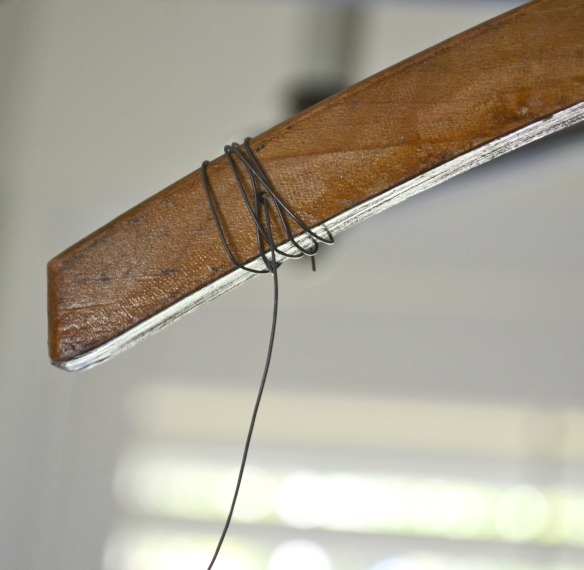 All that’s left to do is to hang your bat mobile. We hung ours right under an air vent…to help the bats fly a little.
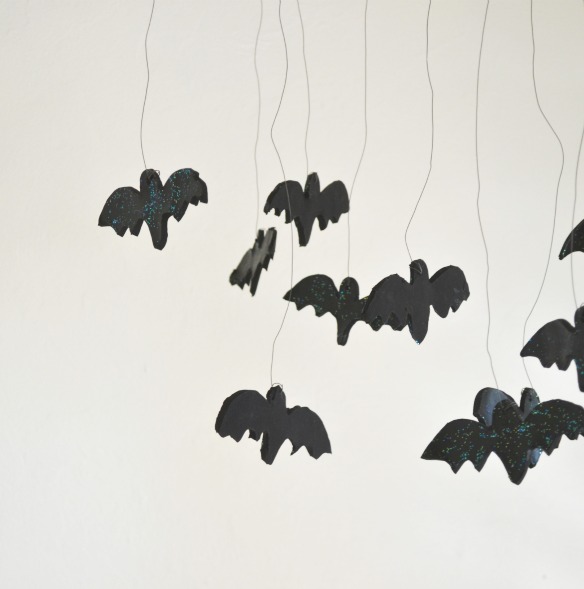
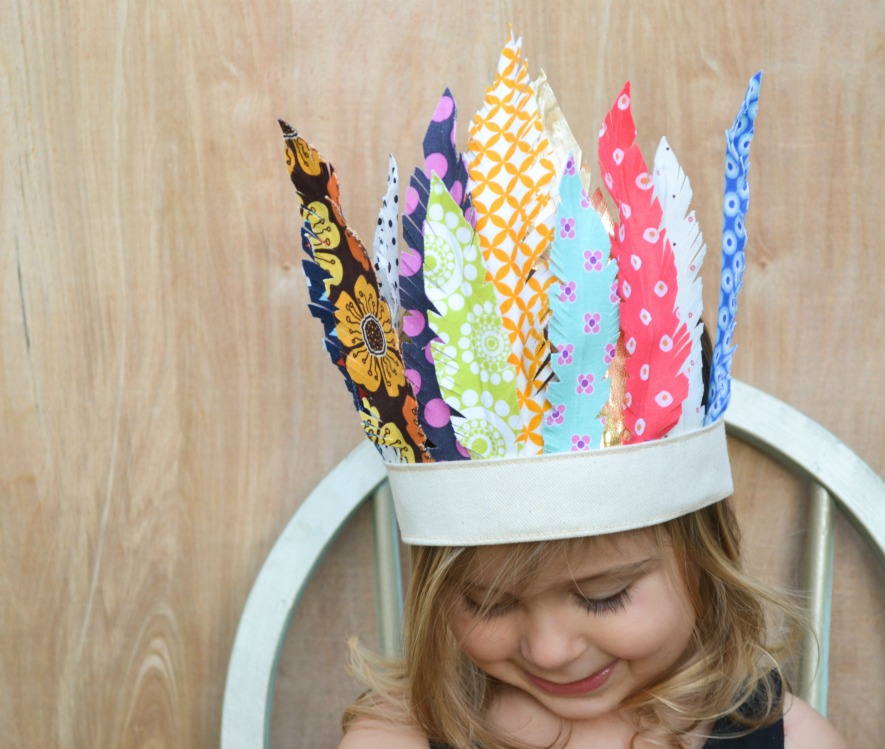
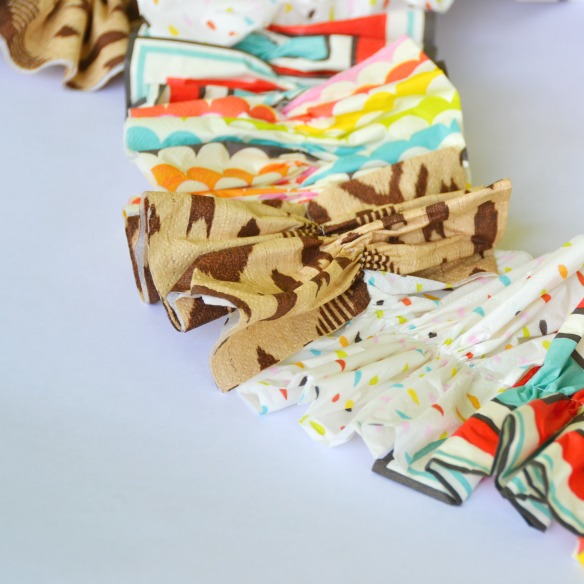
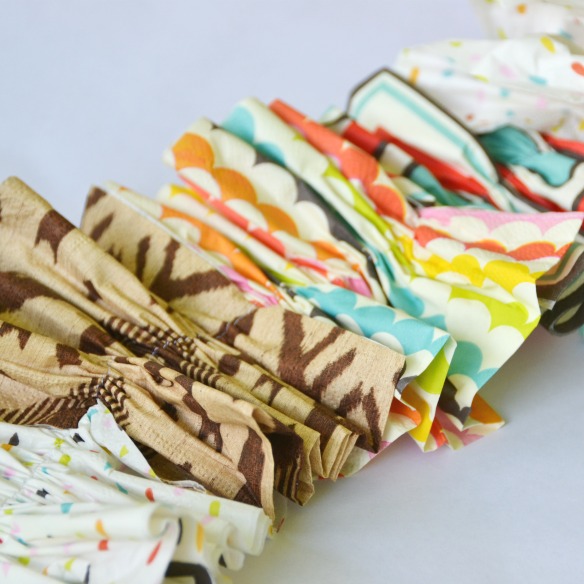
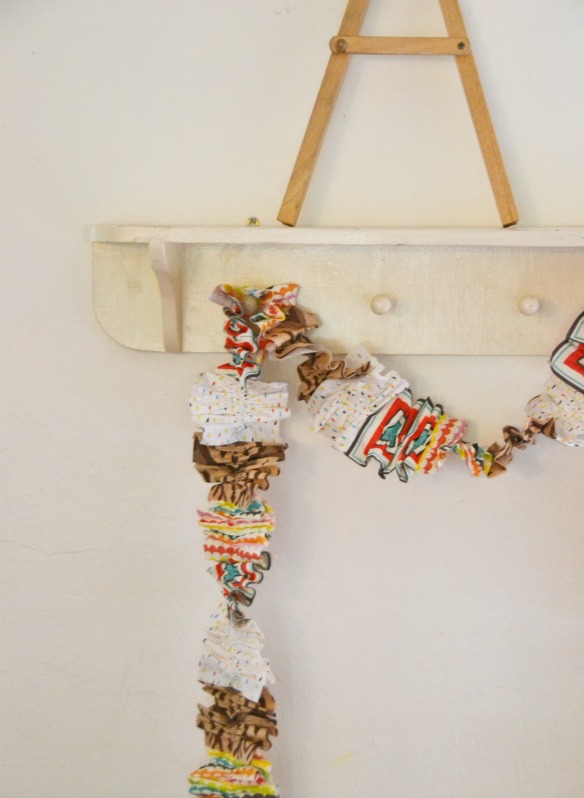
Bohemian Fabric Feather Headdress…
I’ve been dreaming this one up for a while. I was going to make this for the scraps challenge in the So You Think You’re Crafty contest, but I didn’t have the kinks worked out. I have finally gotten around to it…and I’m obsessed with how it turned out. This may be one of my favorite projects ever!
Supplies Needed:
- Fabric scraps
- 17 x 6 piece of canvas or drill fabric
- Heat n Bond Ultra
- Floral wire (see notes in blog post)
- Elastic
- Sewing machine
- Scissors
- Iron
Instructions:
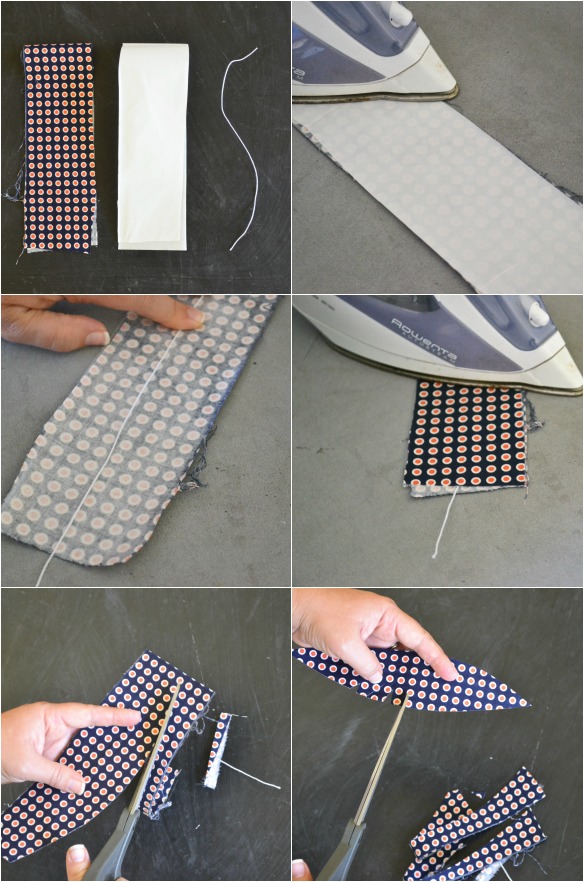
Iron Heat n Bond to fabric scraps.
Remove paper backing and place a 6 in piece of wire in the center.
Fold fabric in half and press with iron.
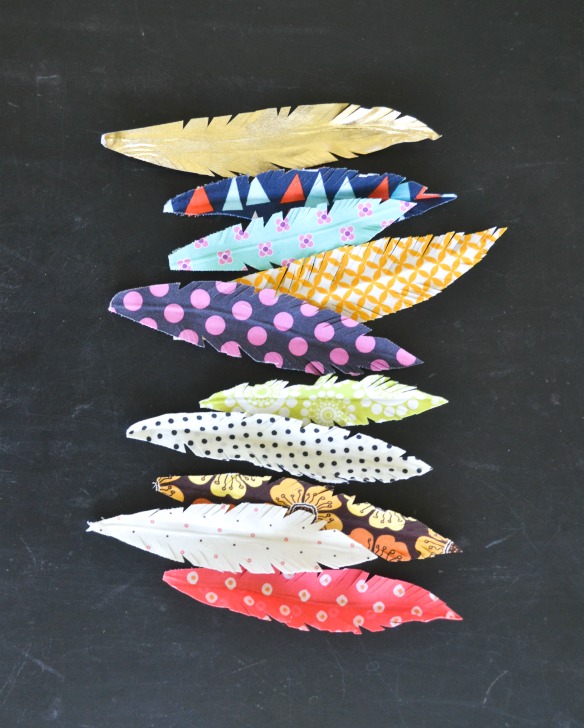
Cut out a feather shape.
Make random notches and slices on each side of fabric feather.
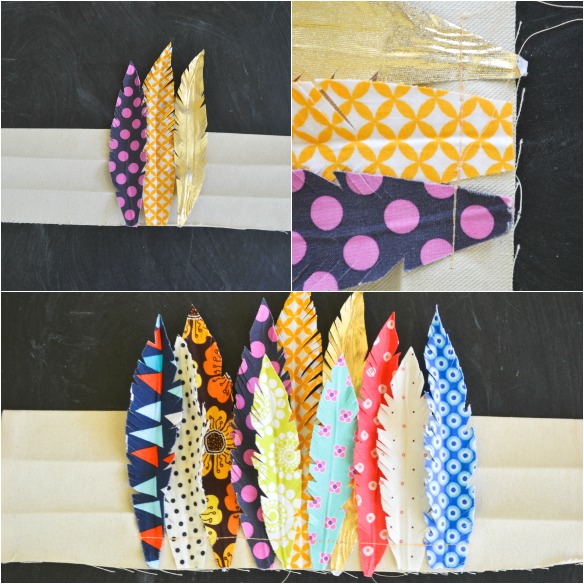
Fold in the ends of the canvas piece 1/4 inch and press with iron.
Fold canvas in half lengthwise and press with iron.
Unfold canvas, then fold each side to center seam you made above, and press with iron.
Fold canvas in half lengthwise one more time and press with iron.
Unfold canvas and begin placement of the feathers on the creased side of the canvas. (Refer to picture below. It’s important to attach them this way, so all of your stitches are hidden in the fold.)
Using a straight stitch attach one feather at a time. Reinforce with back stitching.
Repeat until all feathers are attached.
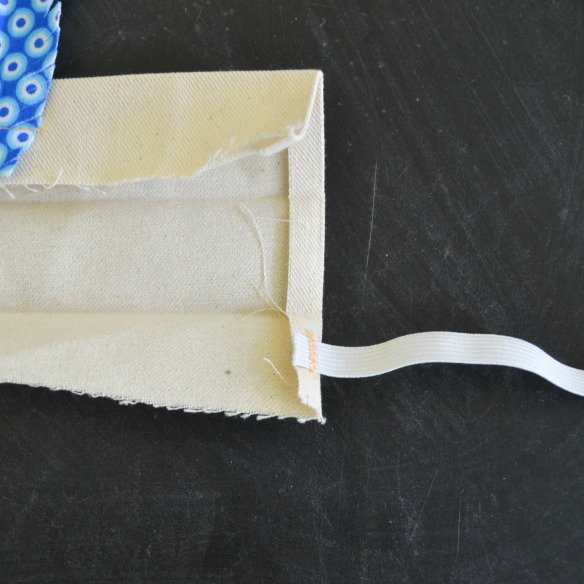
Cut a 3 inch piece (this will vary depending on size of head) of elastic and secure to end fold.
Repeat the same on other end of elastic.
Top stitch the entire perimeter of the headdress.
 The whole project worked out beautifully. The only change I would make is in the gauge of wire used. I chose floral wire because I wanted something I could easily sew over without breaking a needle. However, some of the larger feathers could have used more stability, to keep them from flopping over when moving around.
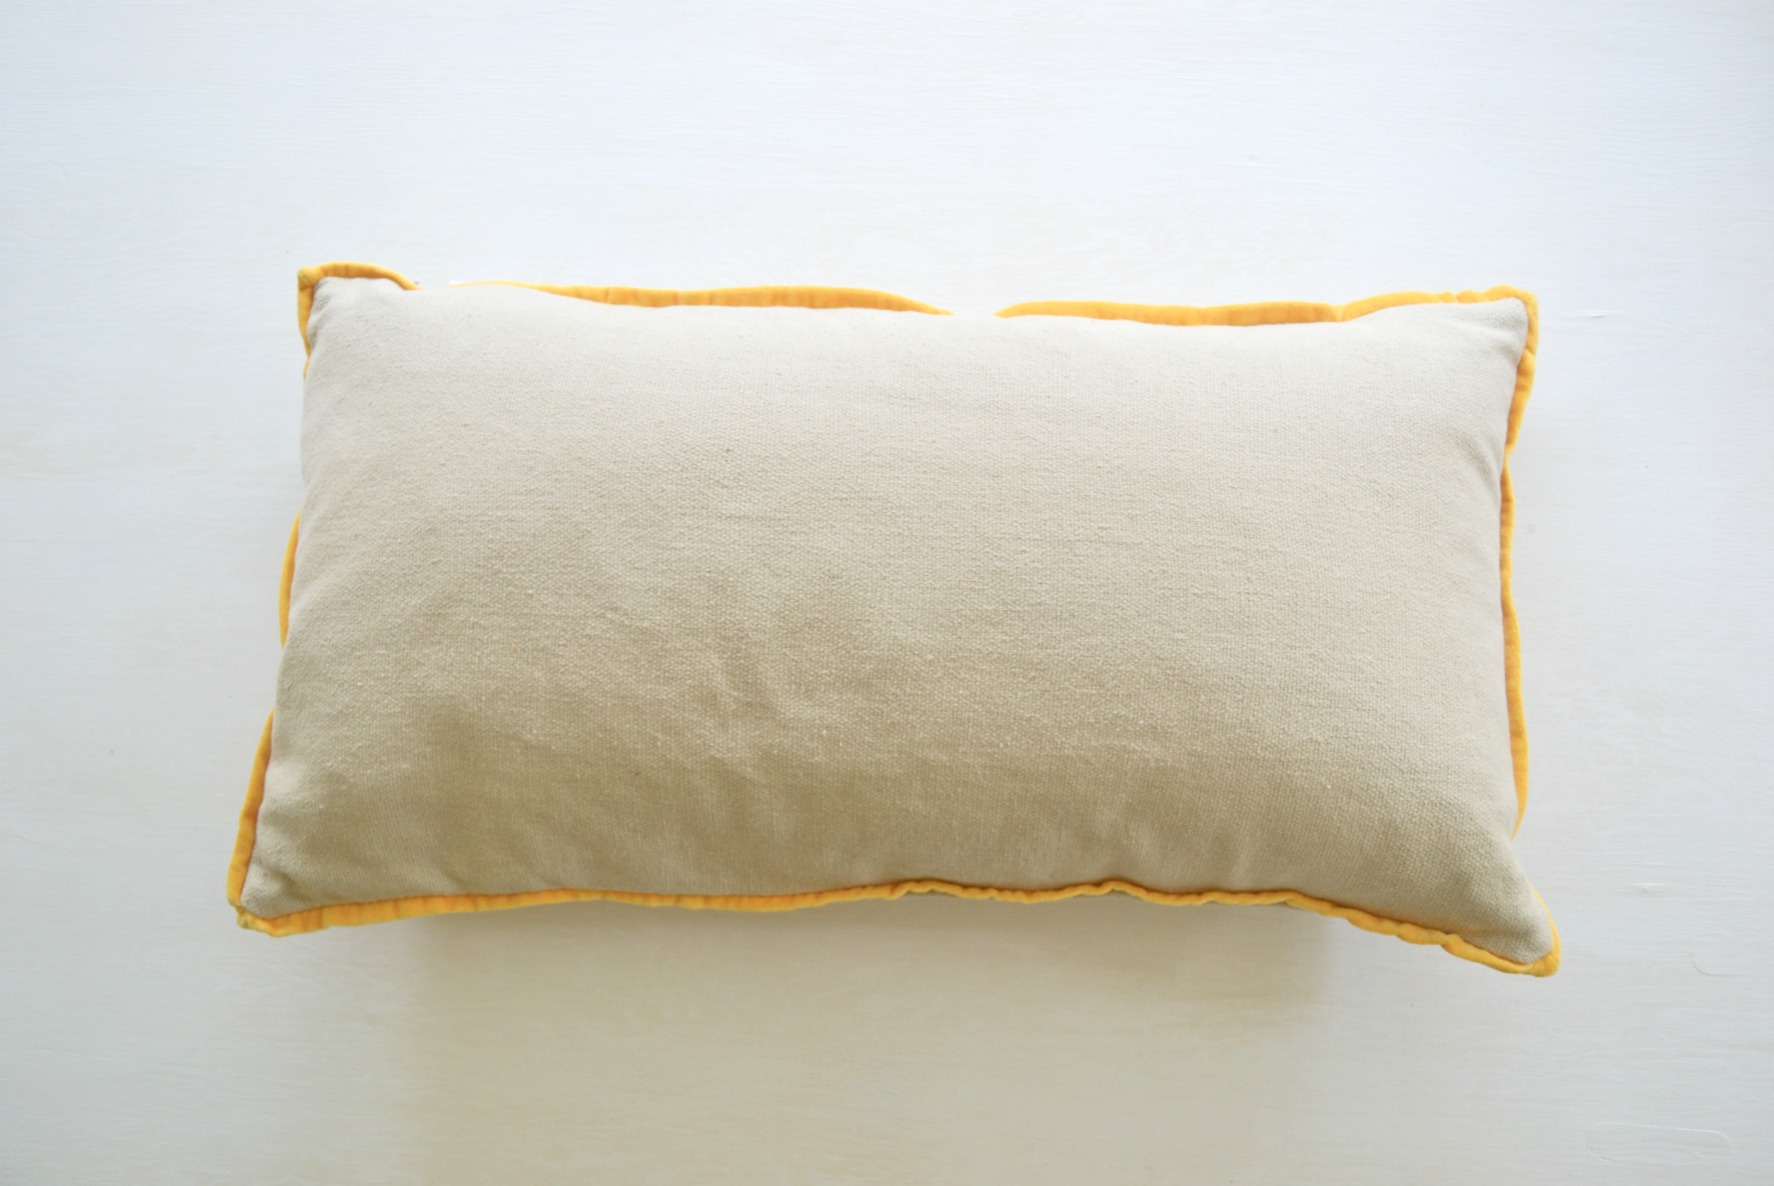
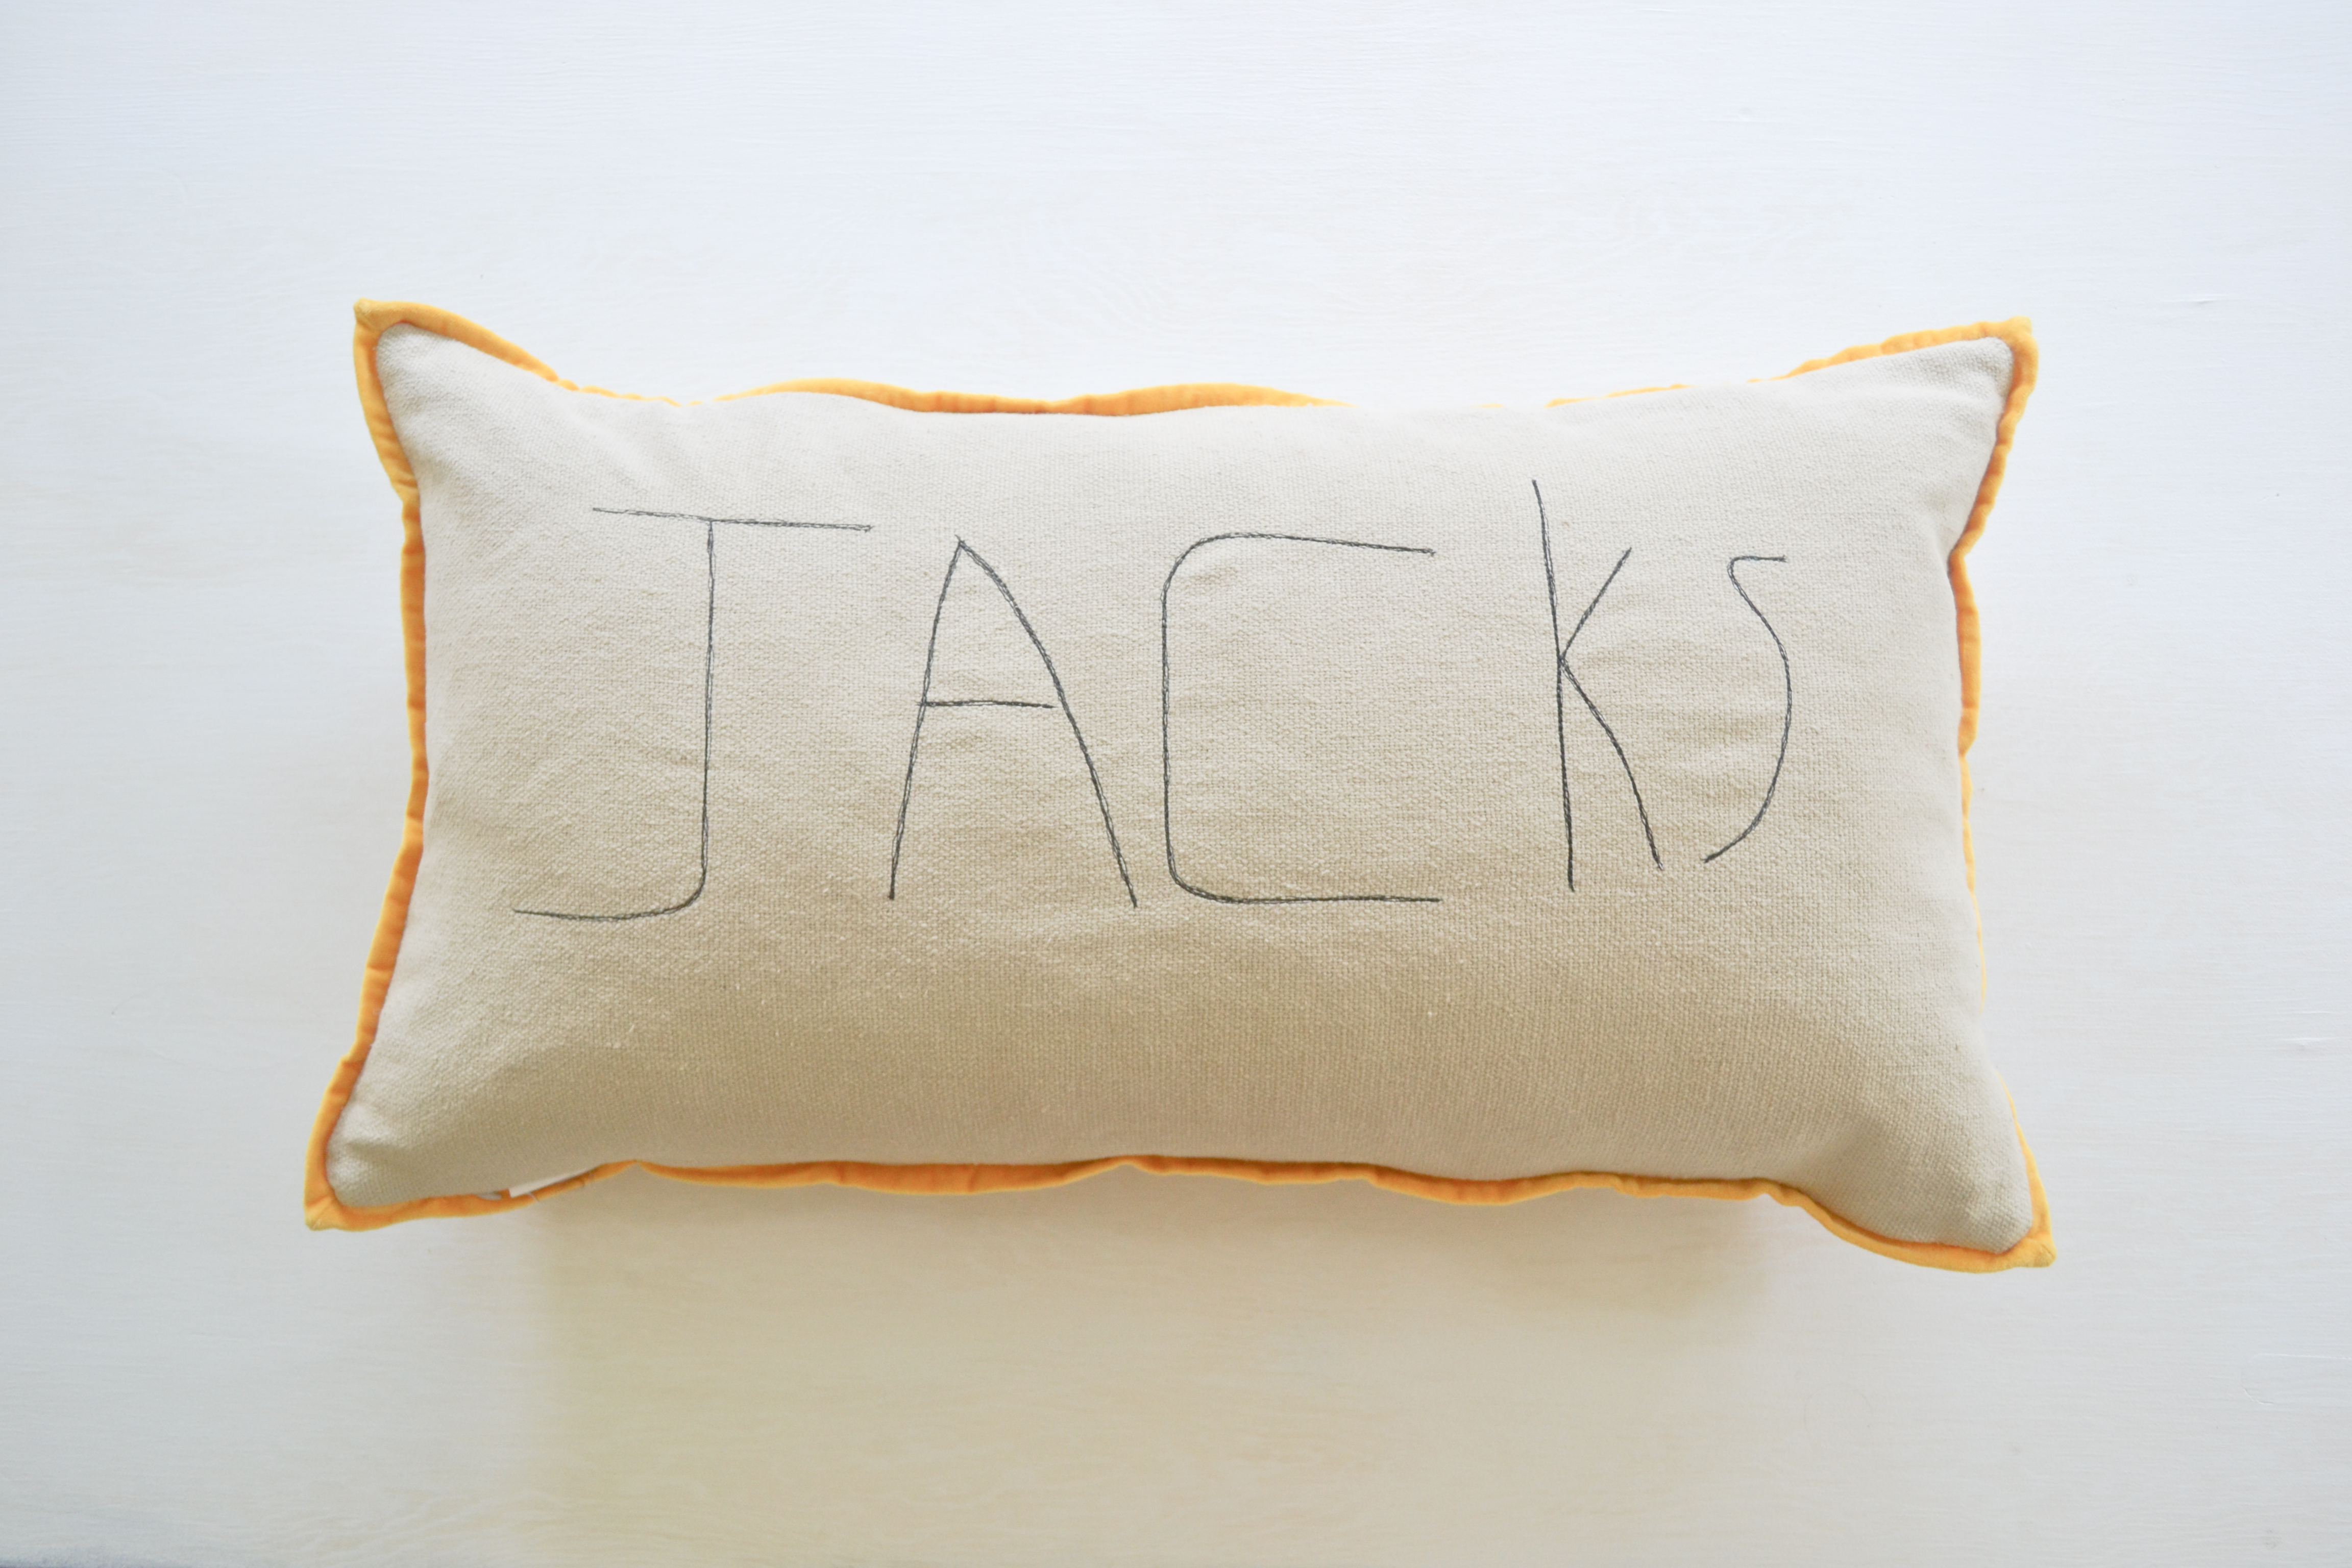
Name Pillow…
I’m a sucker for a keepsake anything. I have rubbermaids full of baby clothes. Boxes full of my kid’s artwork. I think I have about 10 Baby’s First Christmas ornaments. I only have 3 kids. Get my drift? Anyhoo, I’m still working on Jackson’s room makeover that I mentioned about 100 posts back. I kind of work on in bits and pieces. One bit will inspire a piece…and so forth. So, I spotted this yellow velvet trimmed pillow at Homegoods the other day. The neutral fabric was a perfect backdrop for what I had in mind.
I love kid’s handwriting…it’s so charming and whimsical. I have oodles of things with Jackson’s name on it, specifially paper, but I wanted a keepsake. I knew if I had him write his name on the pillow, I could easily stitch it out with my sewing machine. And so I did!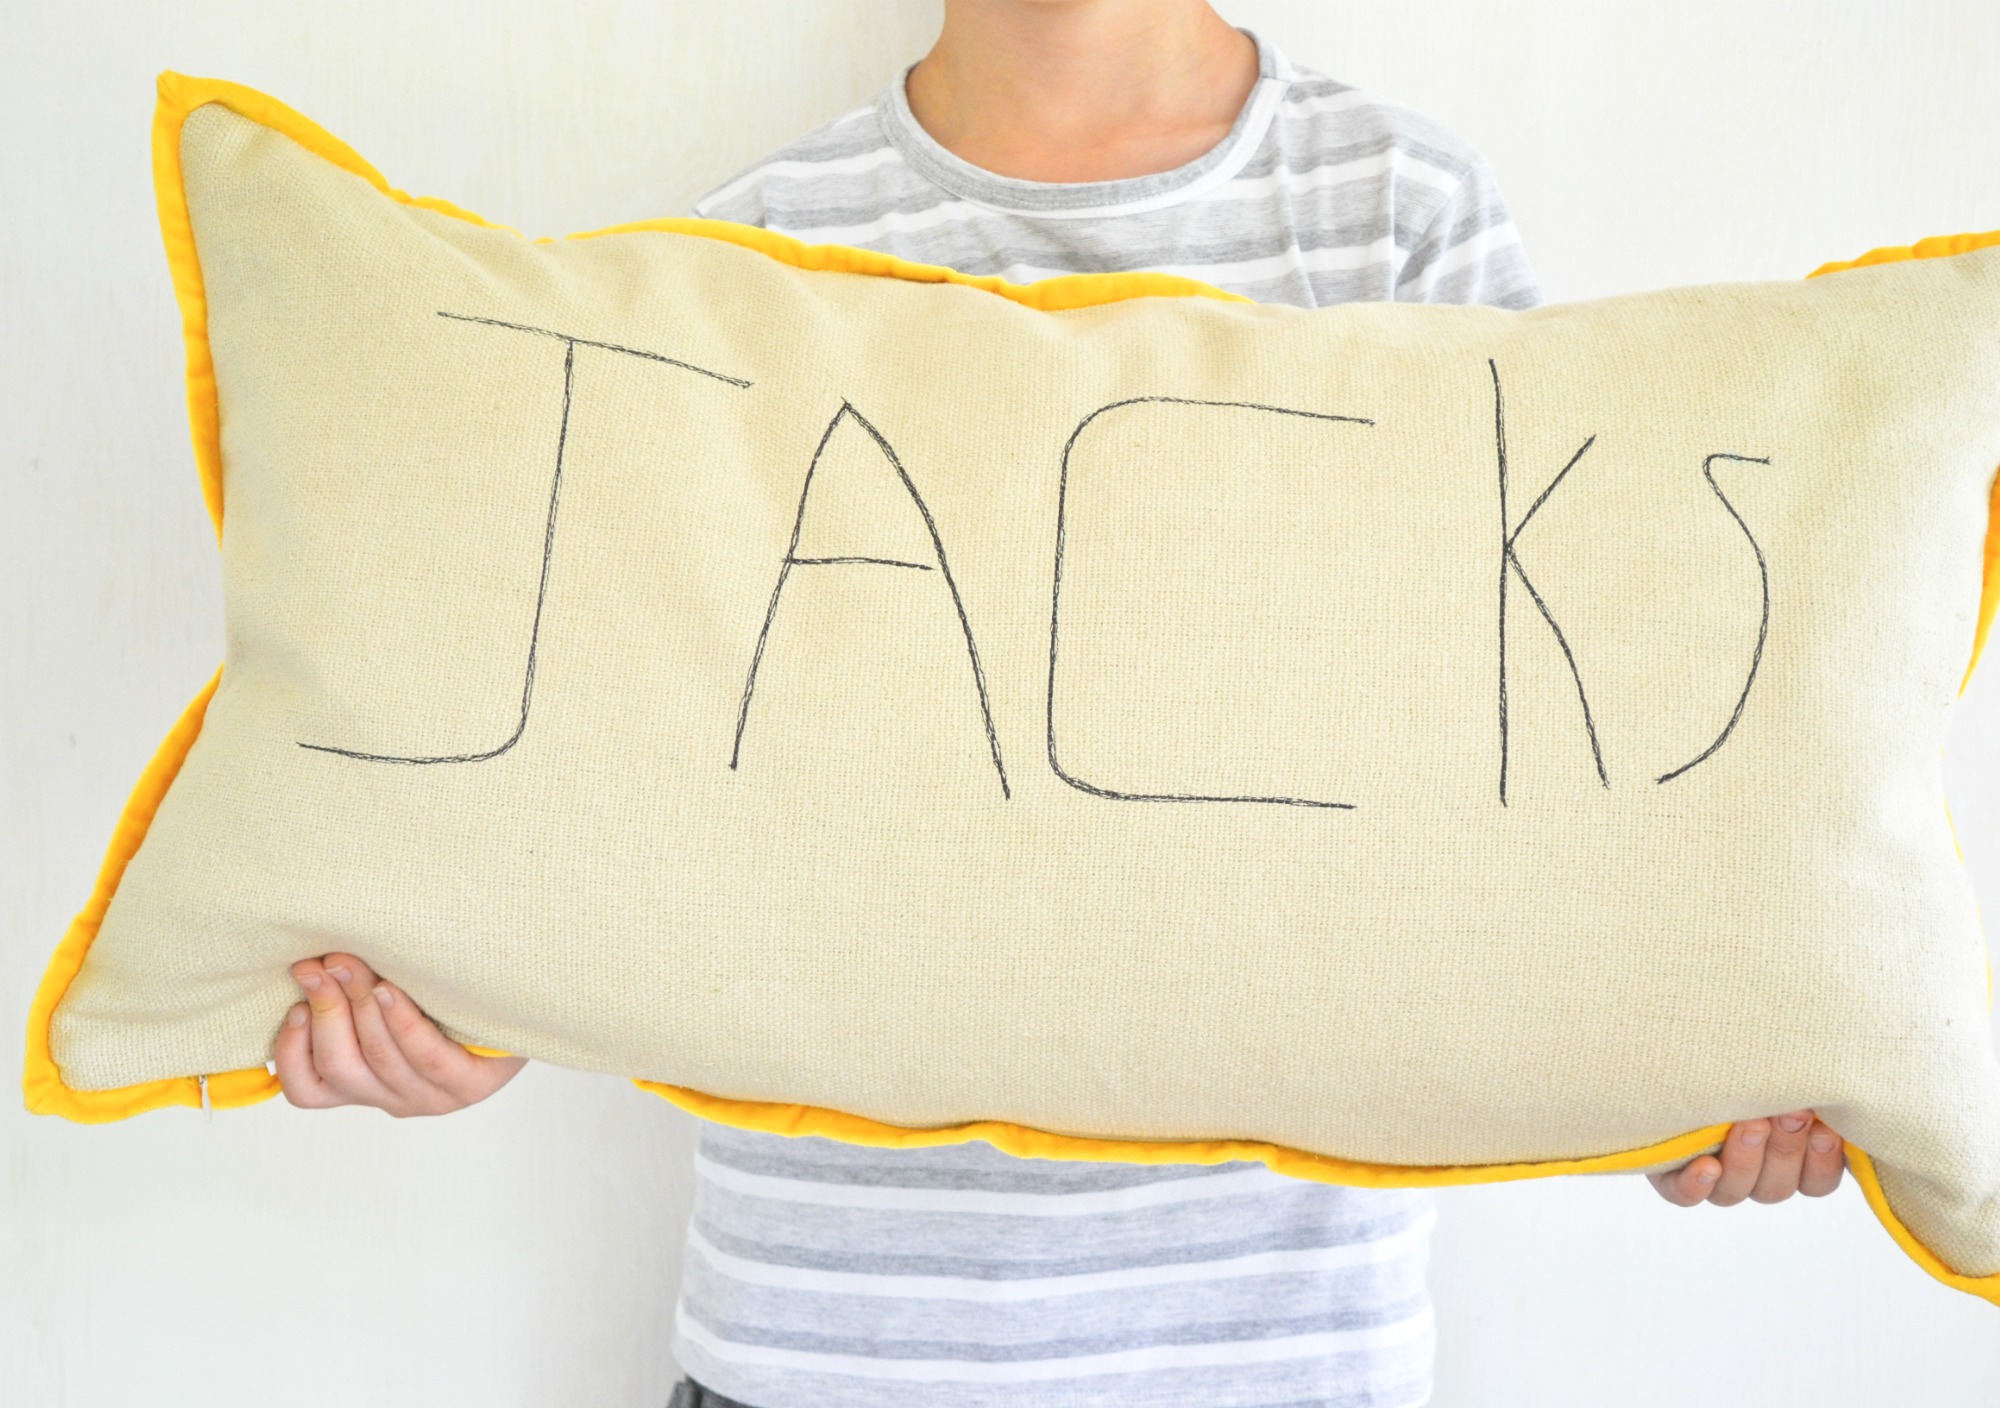
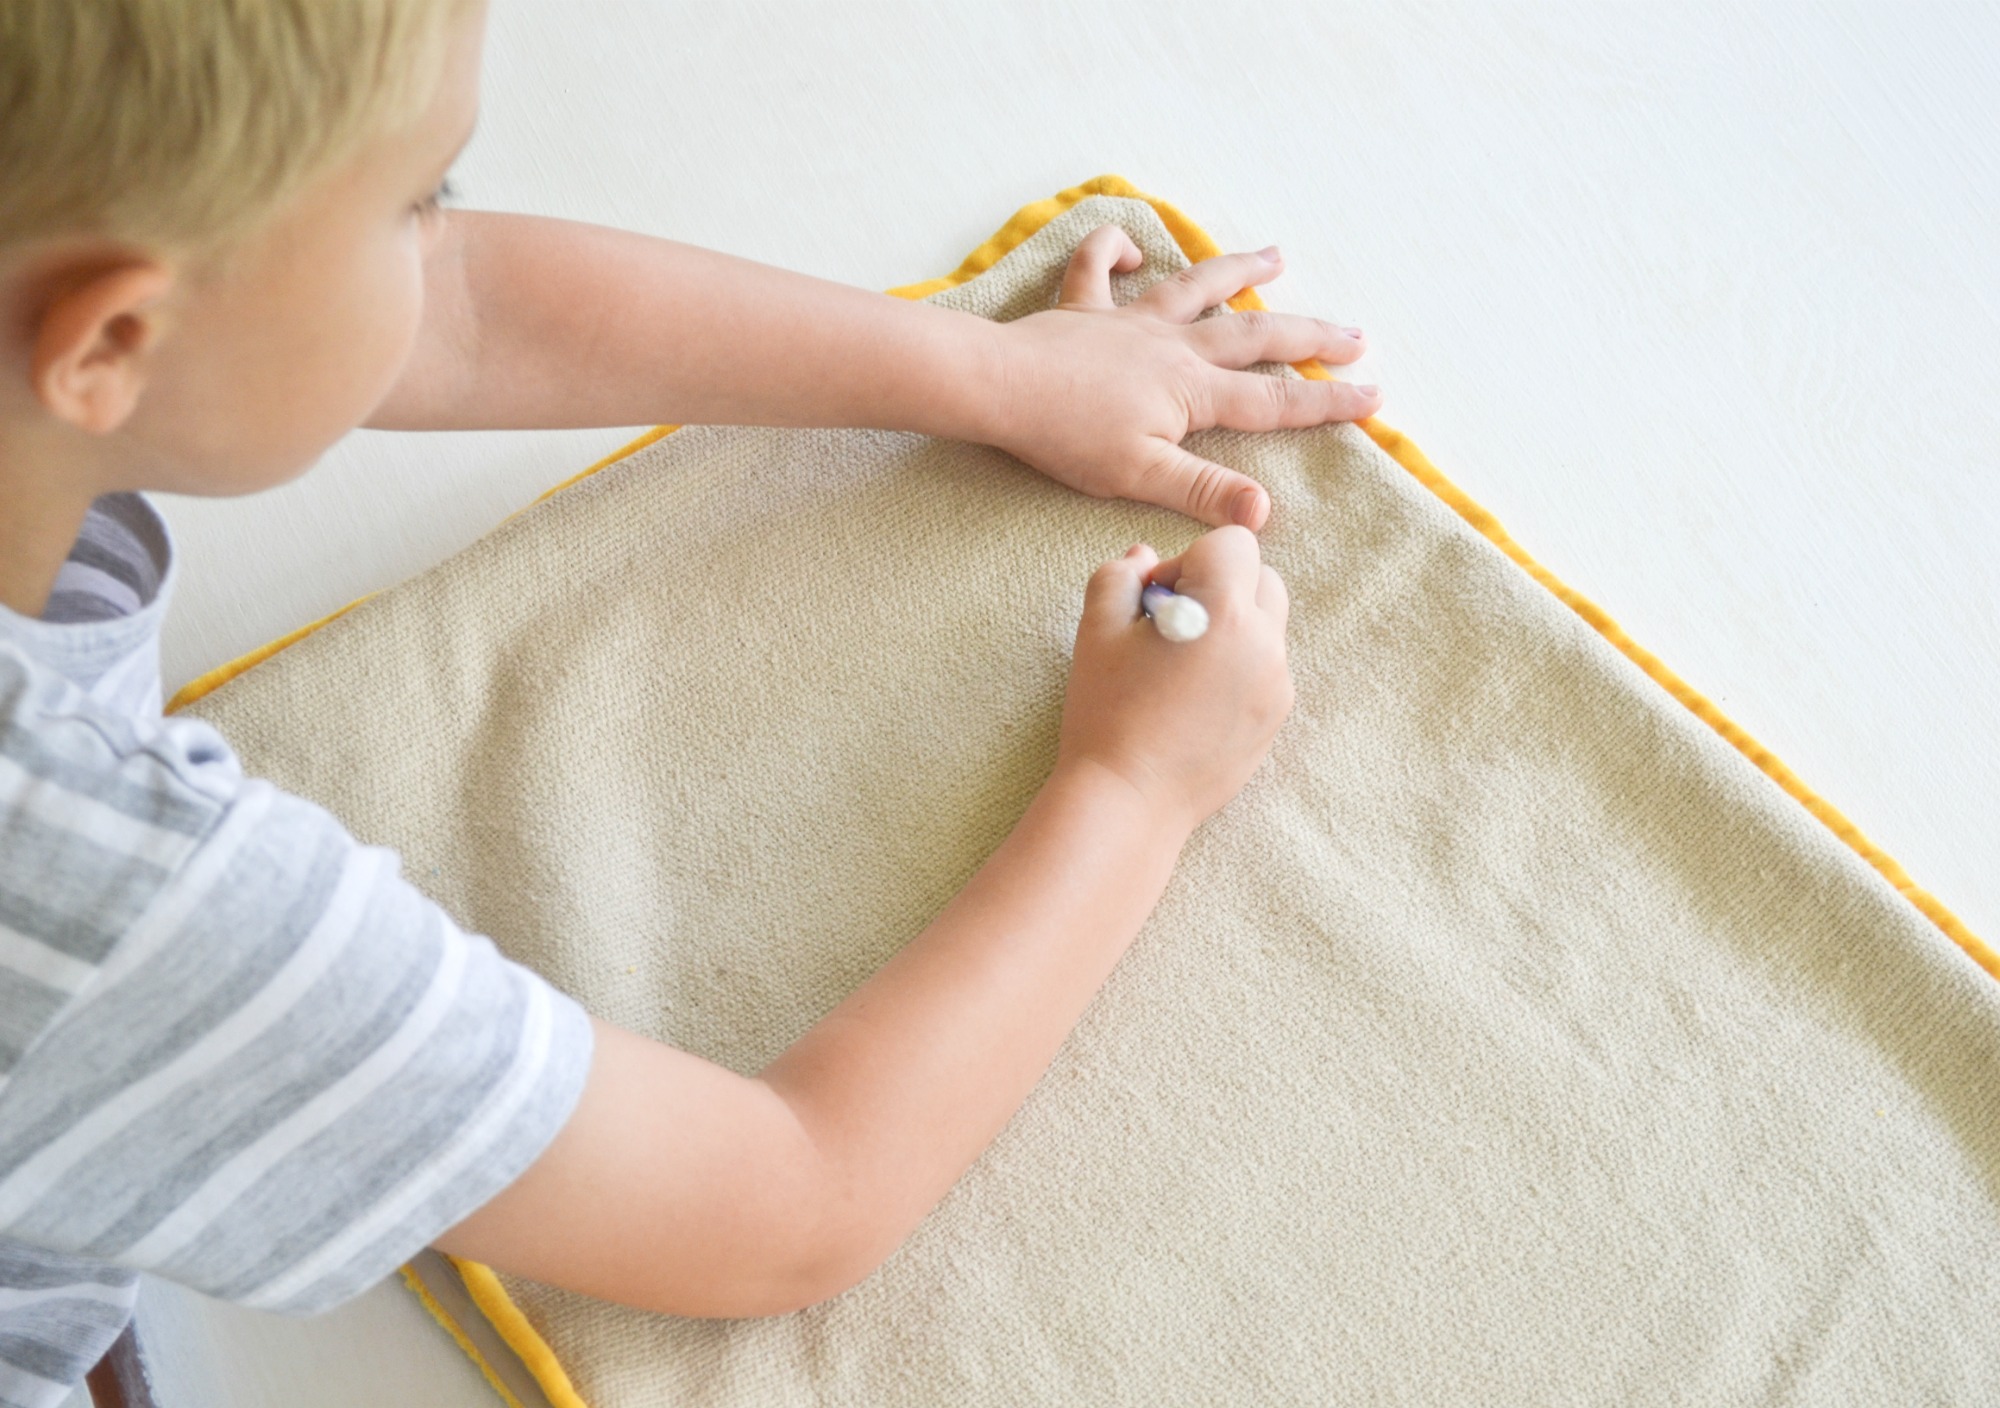
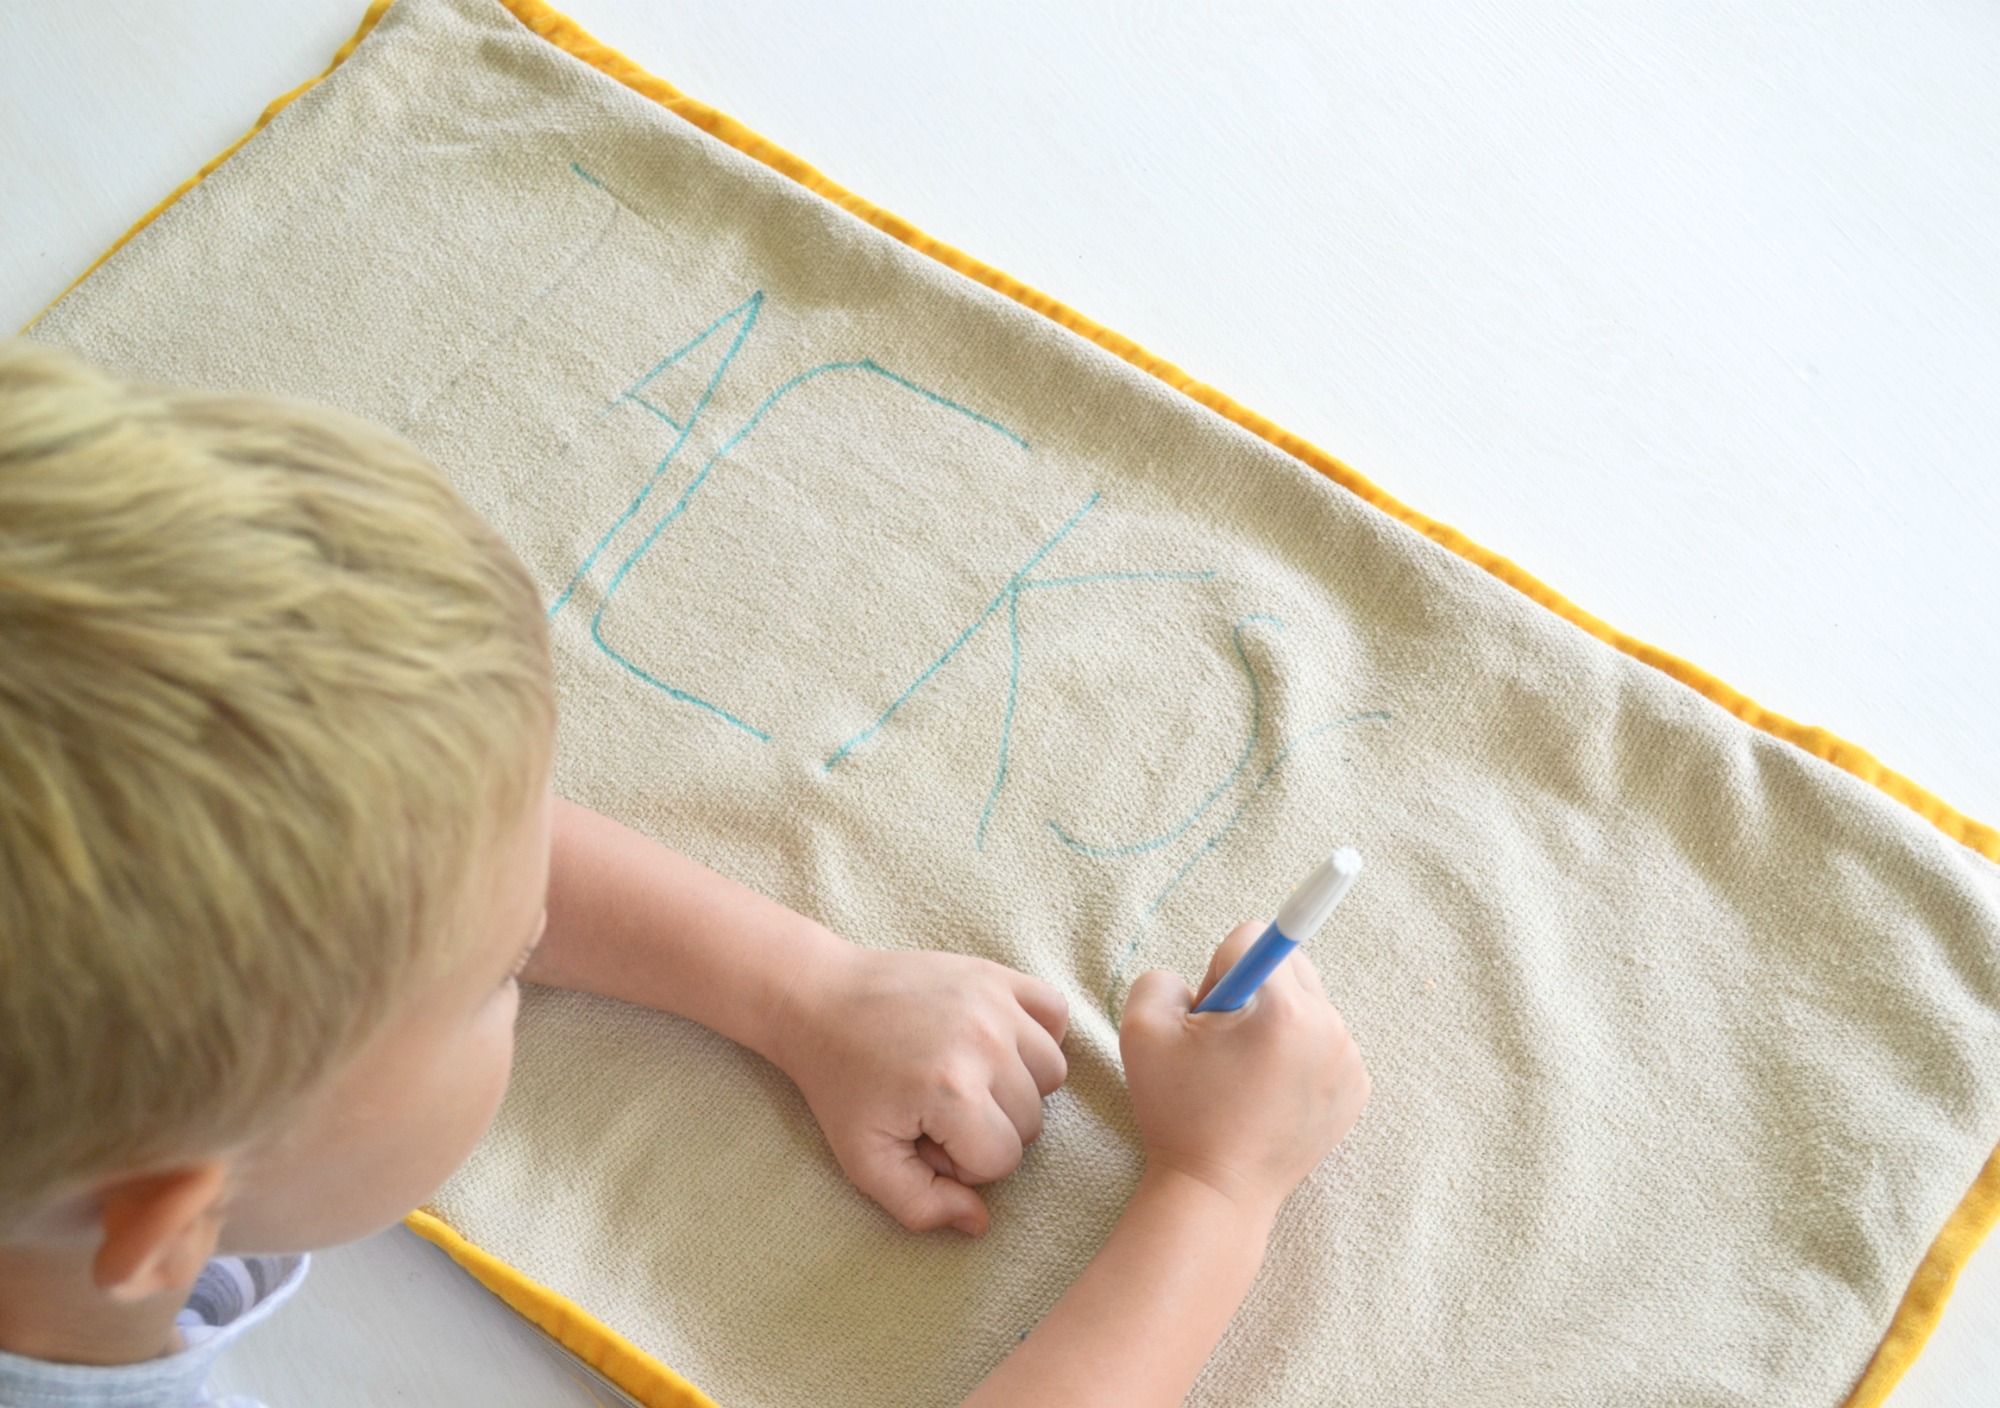 You might need to draw some two horizontal lines if they need help keeping their writing straight.
 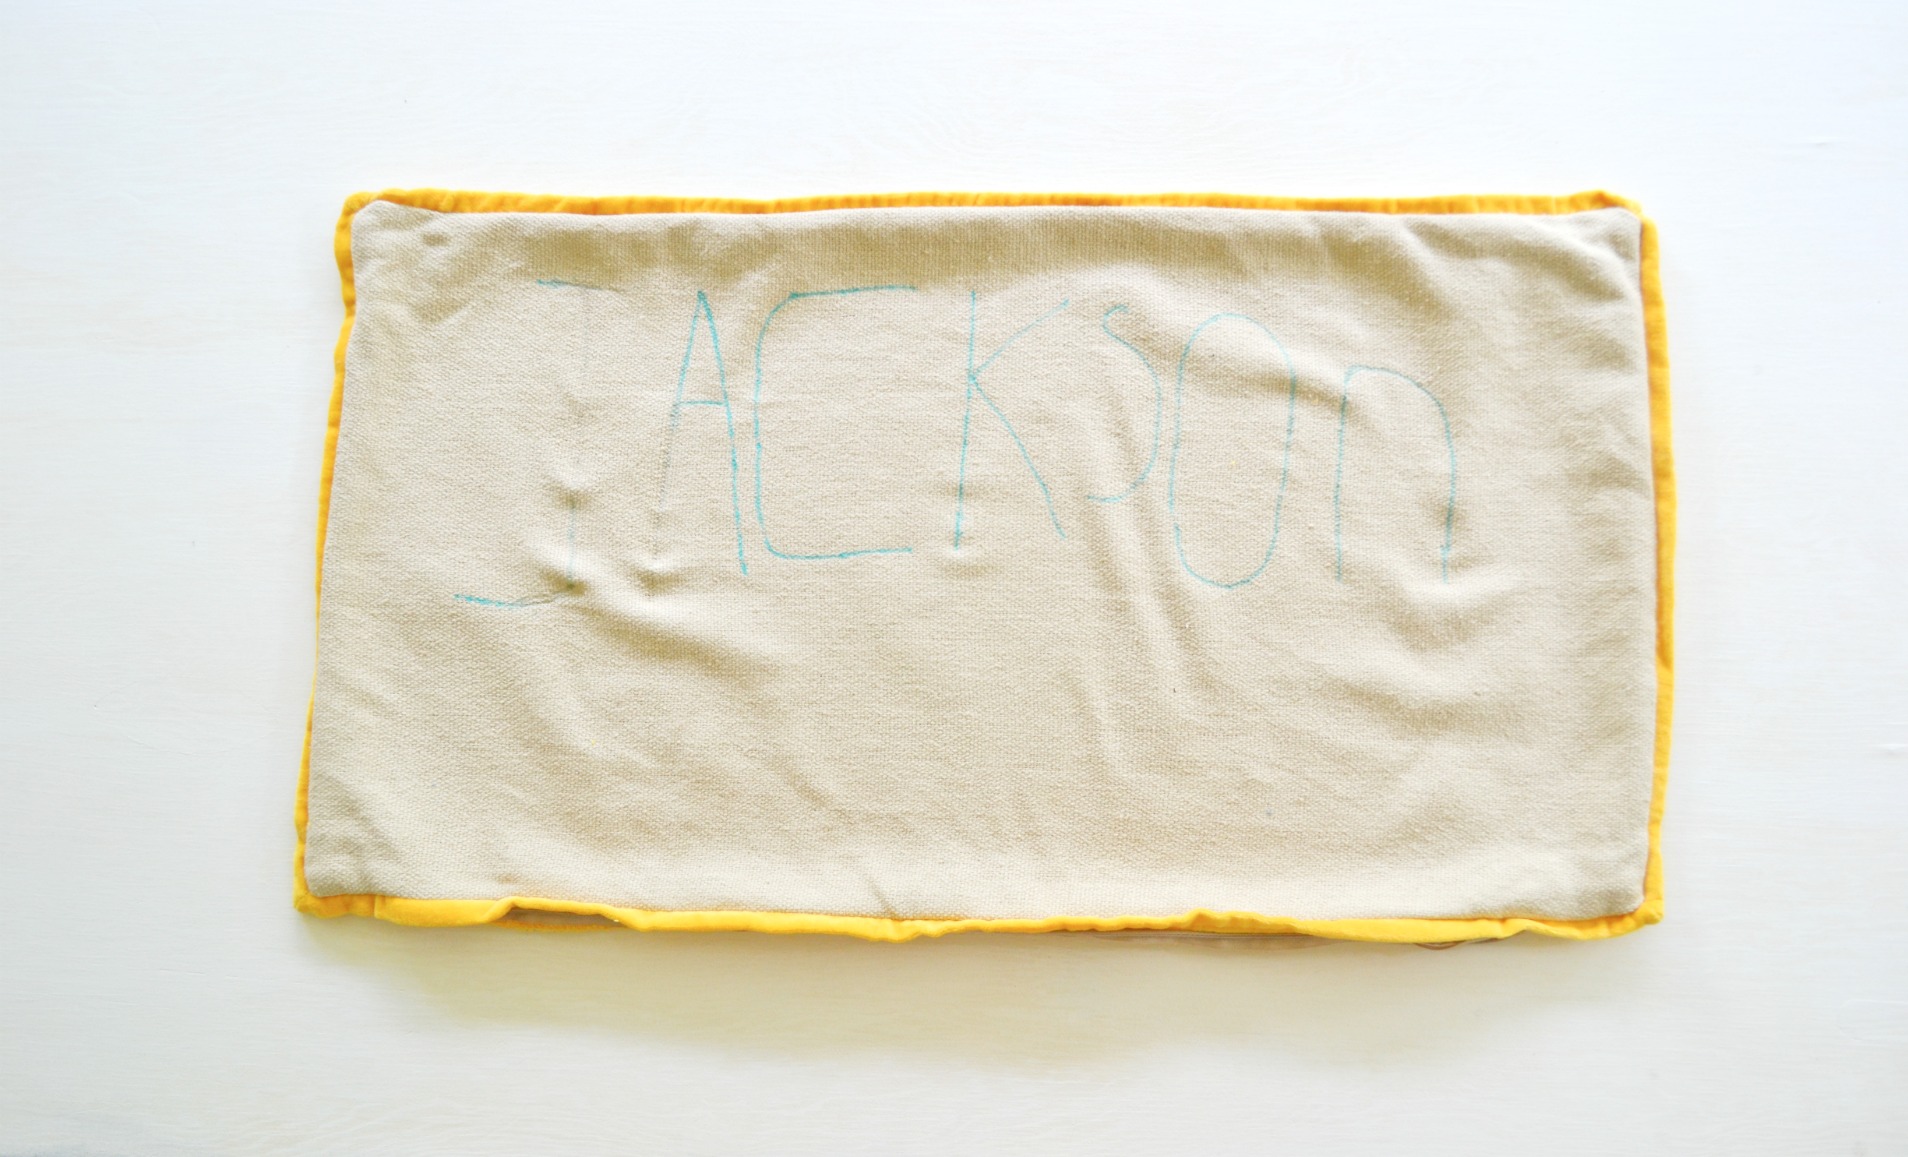 I used black thread and just went back and forth over each letter about 6-7 times, using his writing as my guide. When finished, spray some water and the ink disappears and you are left with just your child’s handwriting in stitches.
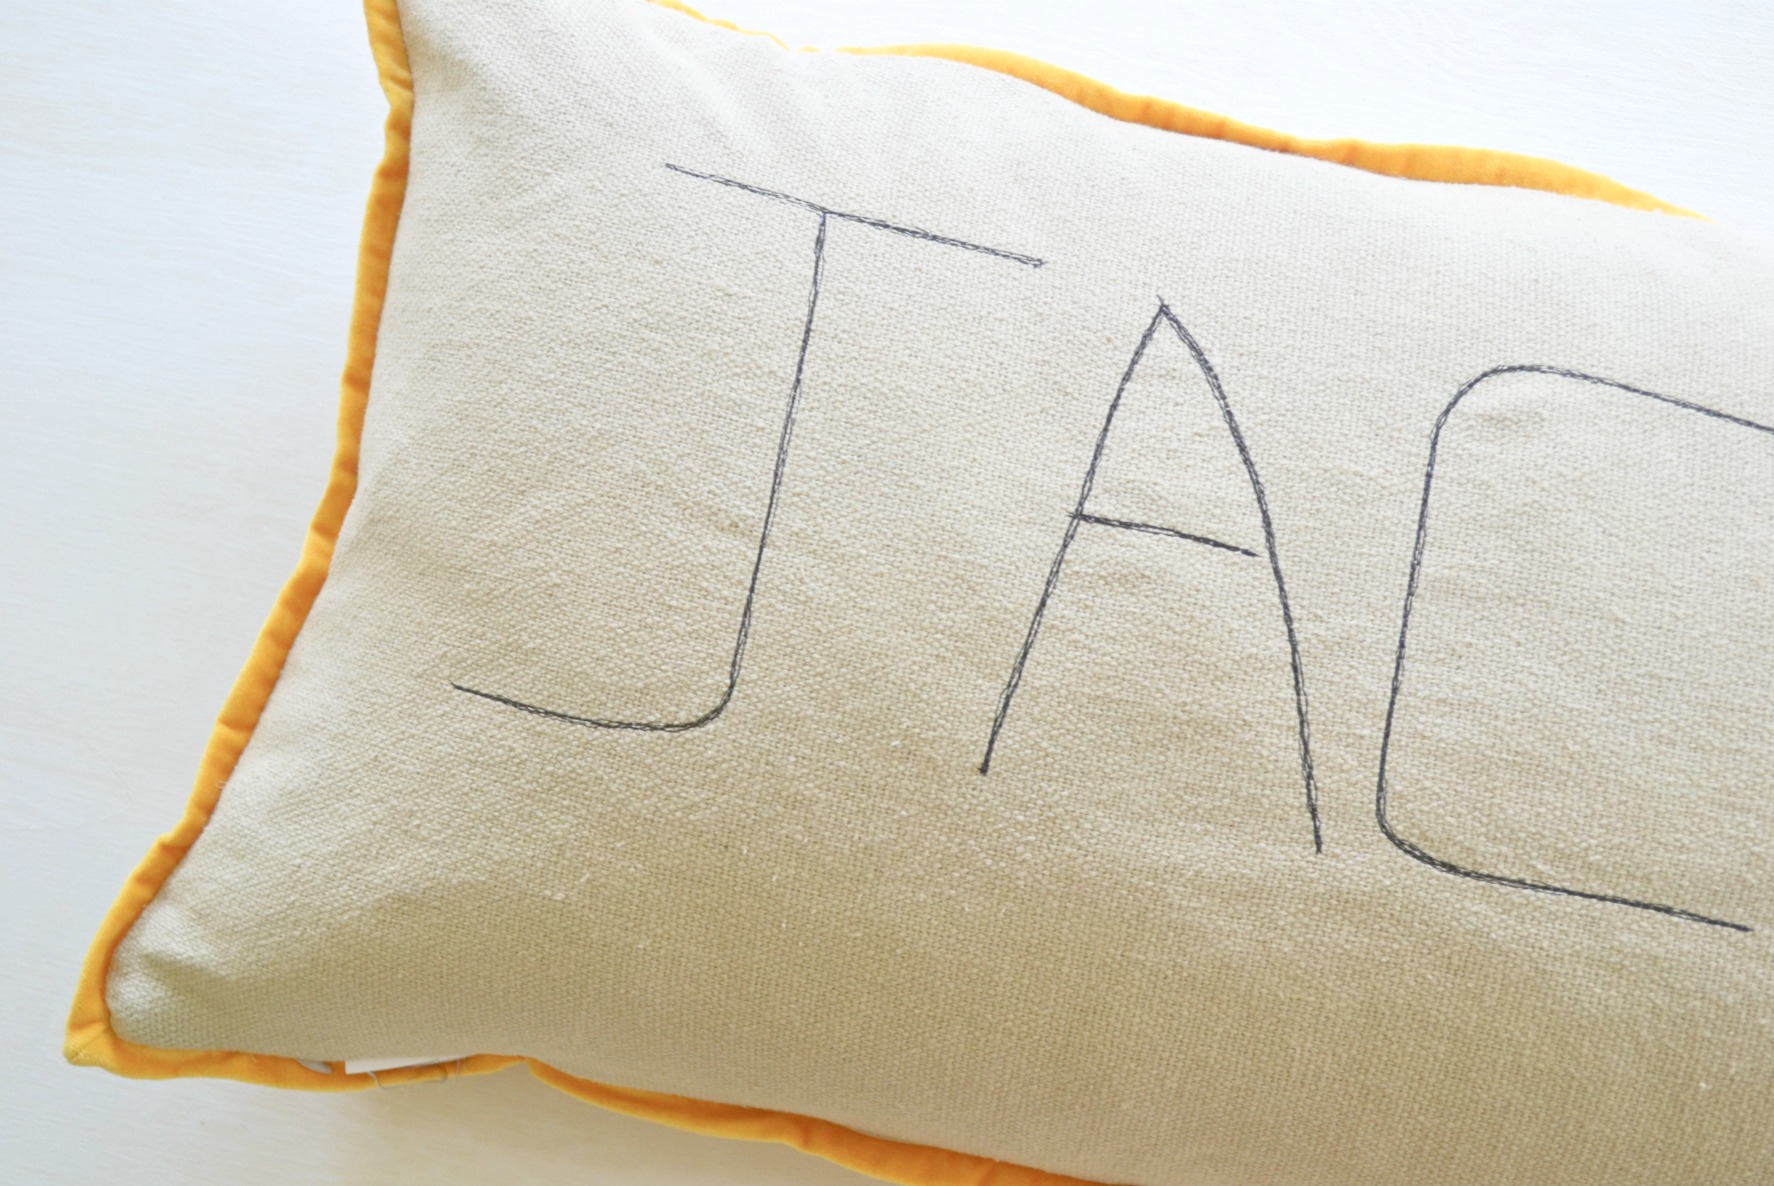
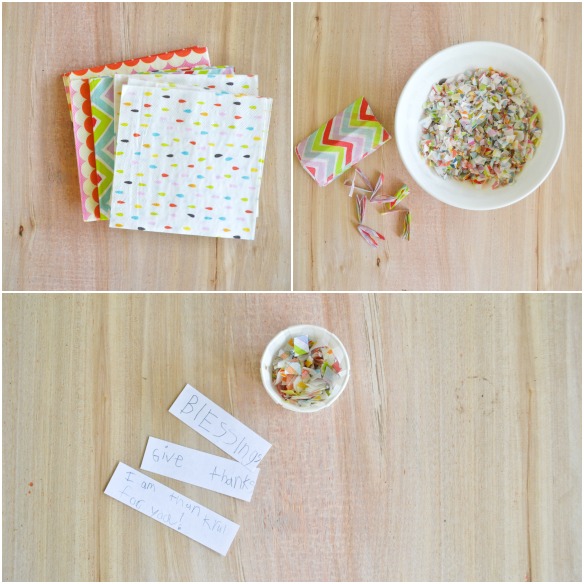
Cocktail Napkin Garland…
For week 1 in the So You Think You’re Crafty challenge, I created this party garland out of cocktail napkins. The challenge theme was, In the Kitchen. Honestly, I wasn’t sure what I wanted to make. I didn’t really need anything for my kitchen, so I opted not to build. I thought about a recipe, but decided nah on that. What I ended up doing was, grabbing a bunch of cocktail napkins out of my kitchen cabinet and turning them into this cool party garland!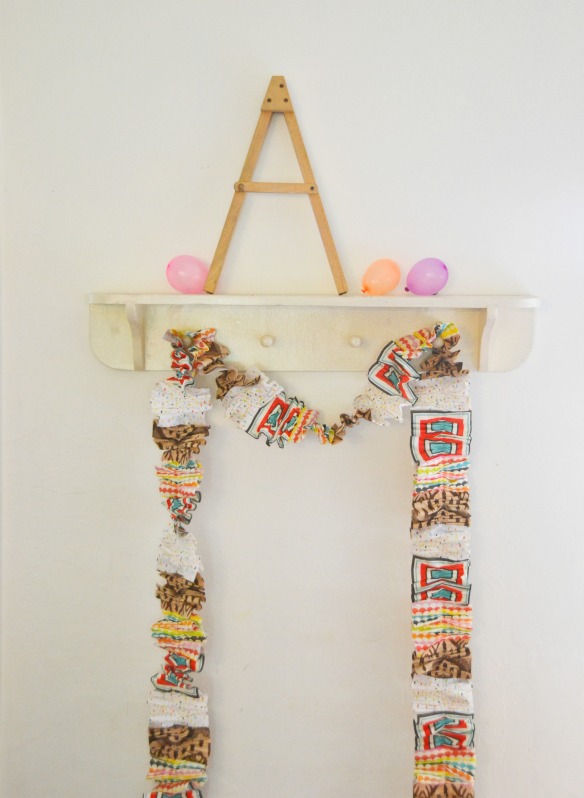 Things you’ll need:
Cocktail napkins in various patterns and colors.
Sewing machine or needle and thread.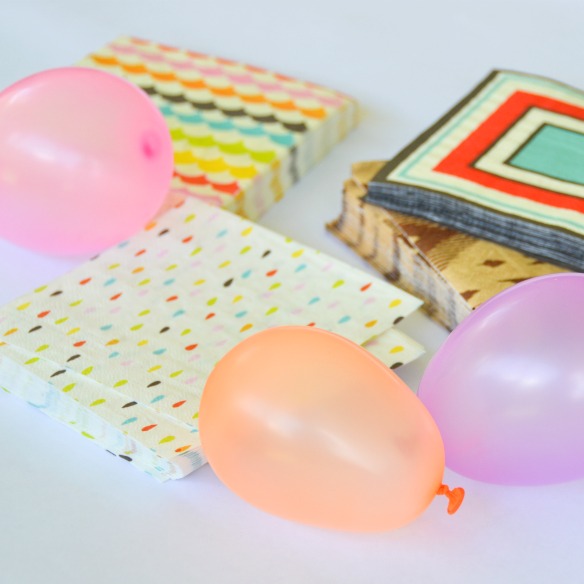 If you are using a sewing machine, adjust your stitch length and tension settings. If you have a gathering foot, attach it now. Place your first napkin under the foot, with the open side facing towards you. Start gathering the napkin and insert your next one inside the previous napkin…a few stitches before the start of the new one. That sounds like a mouthful, but say it a few times and you’ll get what I’m saying. Now, if you don’t have a sewing machine you can gather the old fashioned way with a needle and thread. Of course it will take longer, but definitely still doable. If you did this by hand, don’t worry about the previous step I just mentioned. Simply, do a series of needle up, needle down through the napkin in order to make a gather.
 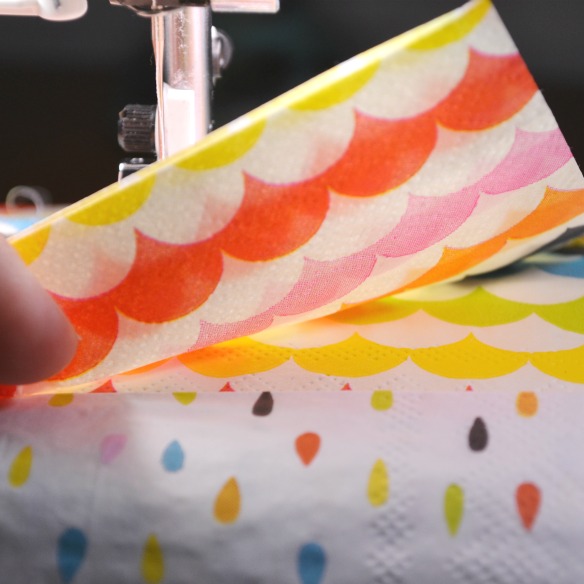 Keep sewing to your desired length or until you have a string of goodness like this…
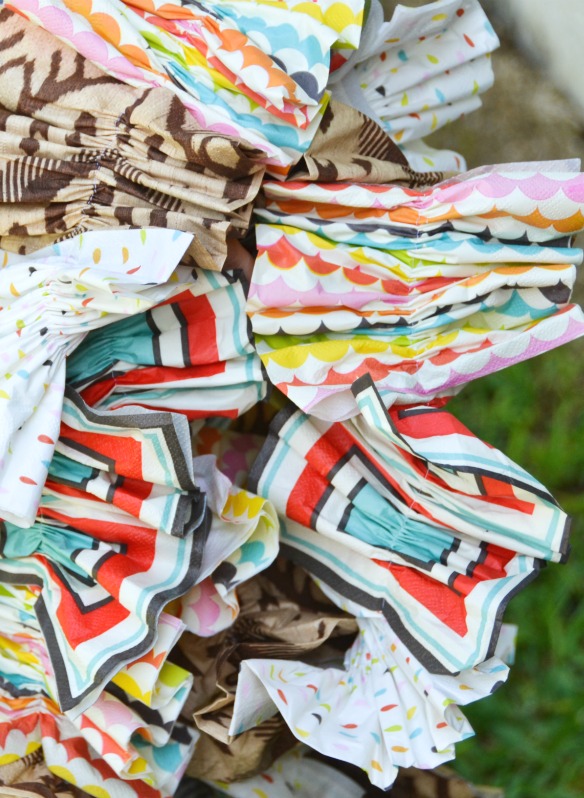
 Hang up and marvel at your cocktail napkin masterpiece! And if a guest asks for a napkin, you can just be all like, Duh.
Paper Cone Garland…
I have been working on this post for nearly 2 weeks. Finally, today I was able to finish up my photo shoot and put together this tutorial.
I’m kind of obsessed with garlands these days. Lately, I’ve been challenging myself to use items I already have around the house. Yes, I’m dipping into my craft hoard and actually using some of my supplies. 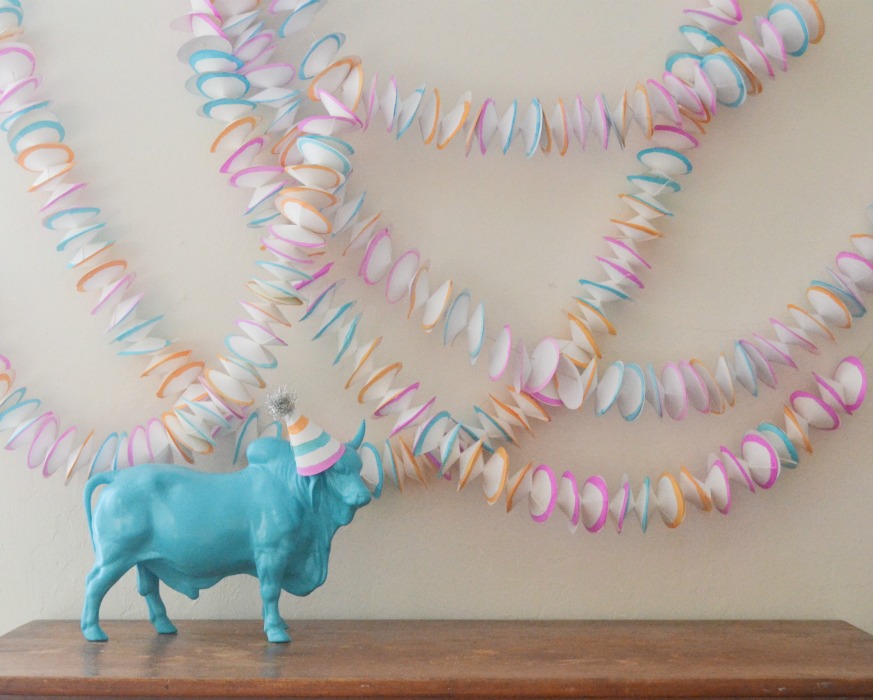
I absolutely love how this garland came together! Isn’t it fun? And look at bull…party animal!
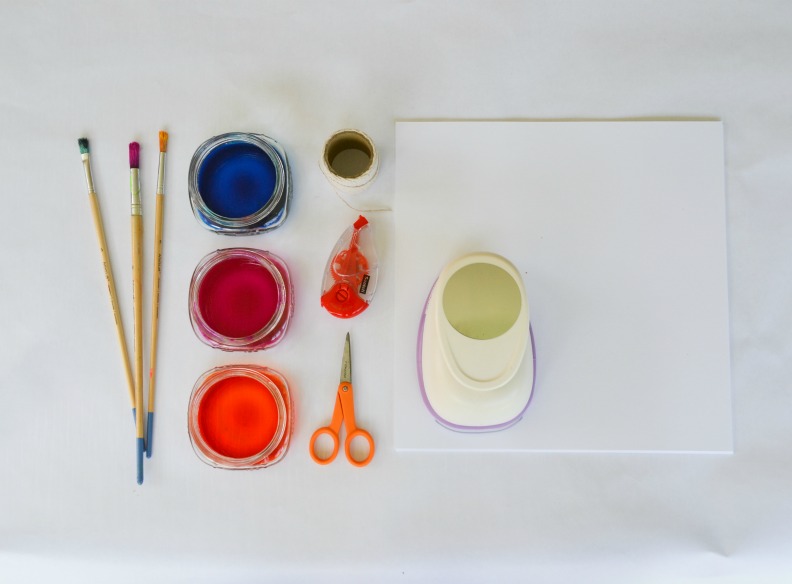
Supplies you’ll need:
- Paintbrushes
- Liquid Watercolors or regular watercolors
- Circle punch
- White cardstock
- String or twine
- Large eye needle
- Scissors
- Scrapbooking double sided tape
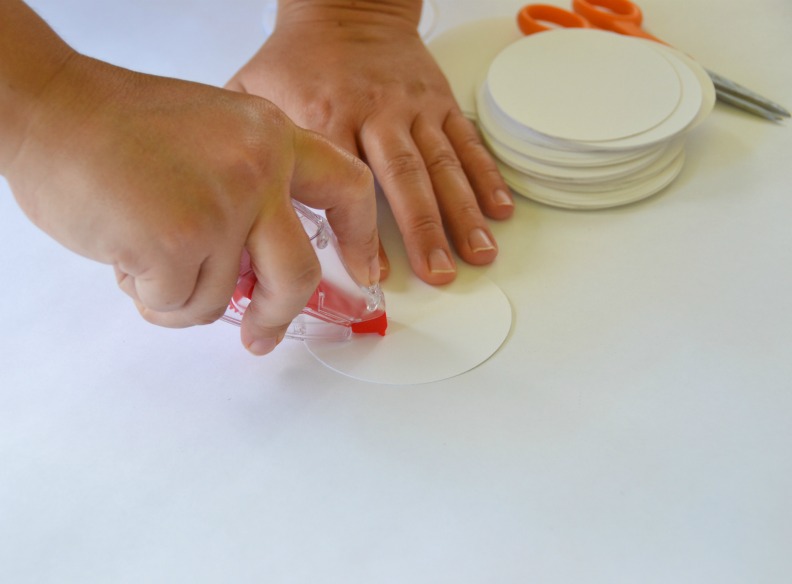
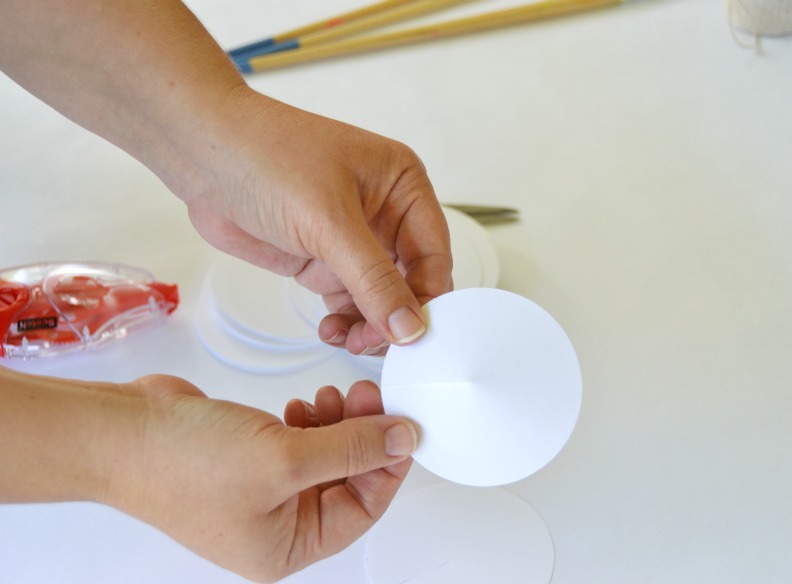
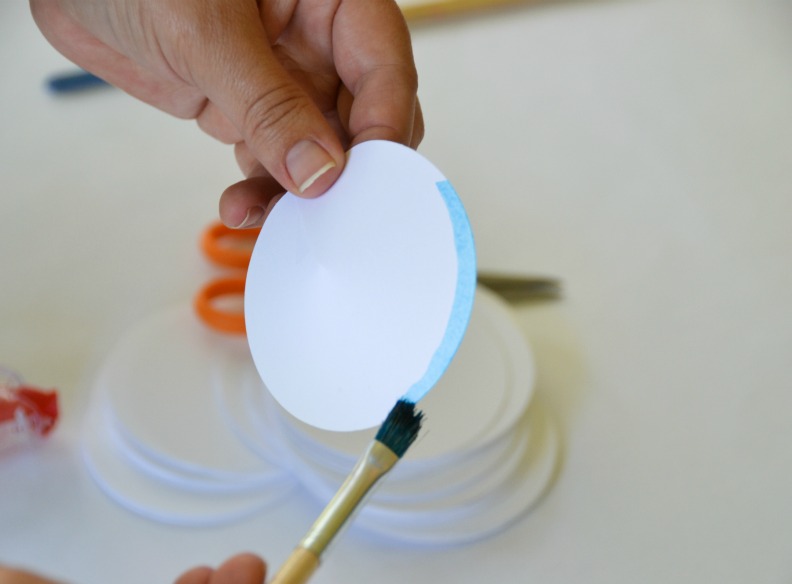
Instructions:
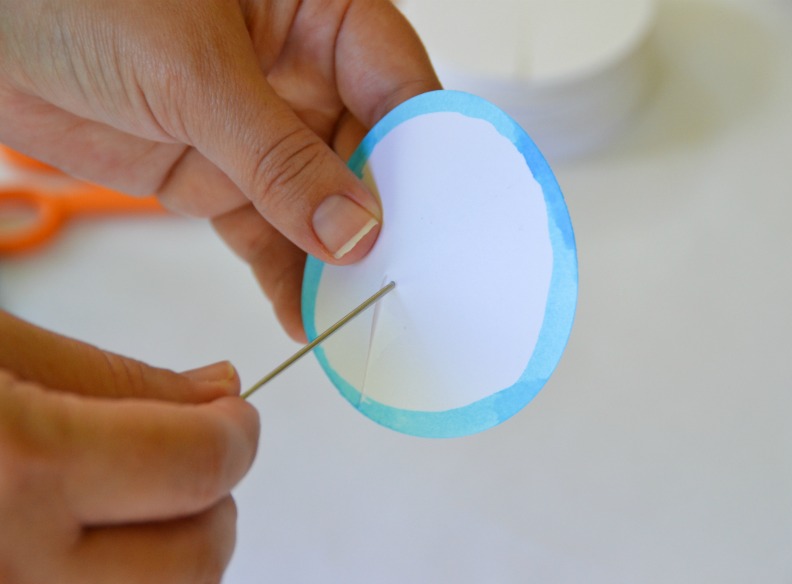
- Punch out several circles from your white cardstock.
- Cut a slit from outer edge to middle of circle.
- Apply double sided tape to one side of the slit
- Form circle into a small cone and secure with tape.
- Paint around the perimeter of the cones.
- Thread painted cones, alternating them up and down.
- Hang and enjoy your masterpiece!
 Here’s a pull back shot of my set up. A certain little girl kept photobombing my shoot with her “well endowed” drawings.
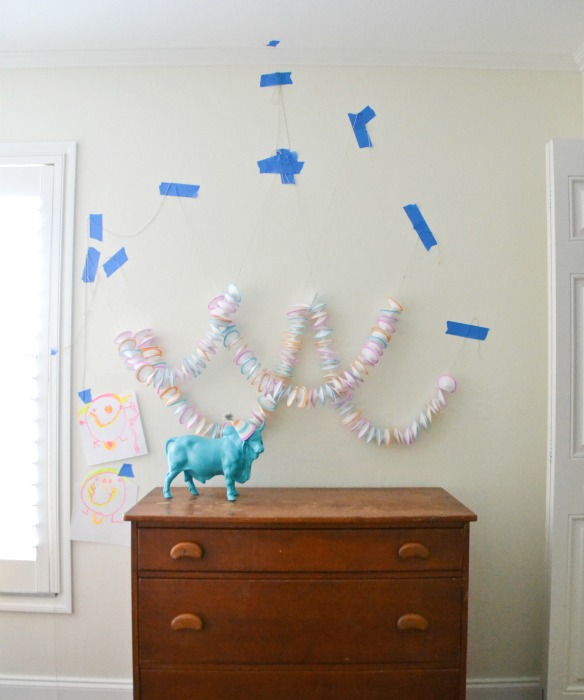


Baking Cup Party Lights…
Like many of my ideas, this one has been swimming around in my head for quite a while. I don’t know what has taken me so long to do up this post, because the whole idea is super easy! It literally took me 5 minutes to do. You know those really cute baking cups? I had some mismatched ones just sitting in my cabinet. There were too few to use for a party, so I embellished a string of indoor lights and created this fun party accessory!

What you’ll need:
- Baking cups
- Indoor mini string lights
- Awl or other pointy object of similar diameter.

Instructions:
Using the awl, poke a hole in the center of all the baking cups.
Do not make the hole too big, or the baking cup will fall off.
Insert lights into baking cups.
Plug in and party on!

Obviously, these are a little off center, but they still got the job done.


I love these for a patio party or how fun would these be to take on a camping trip?
God’s Eye Cake Topper…
When I was pulling ideas for Jackson’s living room camp out party, I scoured Pinterest for cake inspiration. Almost every camp out party had the same campfire cake. It was really cute, but I wanted something different. Then I remembered these God’s eyes I used to make when I was kid. Do you remember making these? I made mine at Vacation Bible School, but I know others that made them at camp. The story goes that the four points represent earth, fire, water, and air. Traditionally, they are created to mark a celebration or a blessing. I think that’s a perfect fit for camp out birthday cake!

If you’ve never made a God’s eye, watch this tutorial. It’s been a while since I made one and this helped as a refresher. It’s a just a series of over and under weaving. You can get as intricate as you like, but I kept it simple.
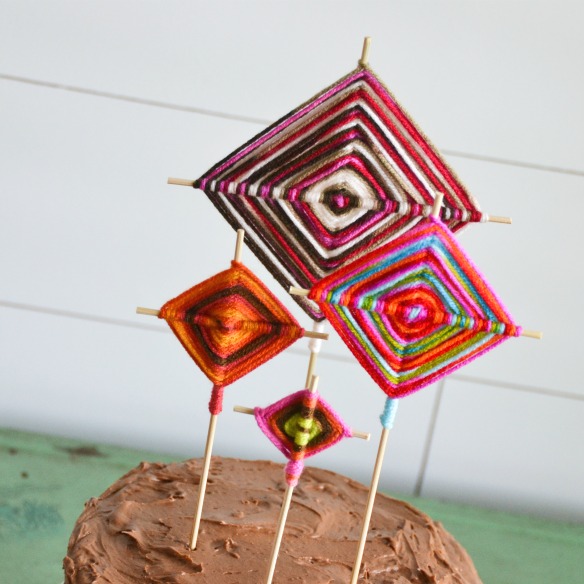
You will need:
- Variegated yarn
- Bamboo skewers
- Scissors
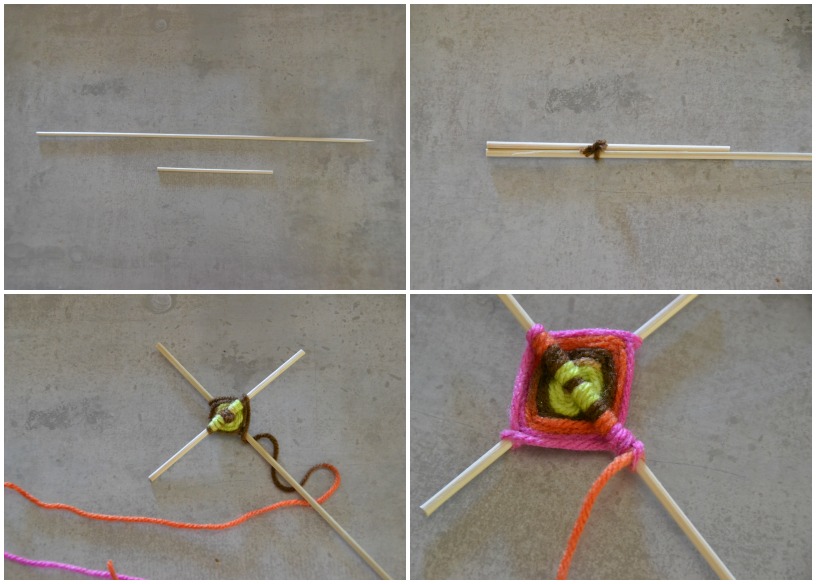
Instructions:
- Watch the video tutorial.
- Cut skewers to desired lengths. Leave one short, one long.
- Tie the two skewers together and knot.
- Begin weaving over and under.
- When finished, wrap yarn around your stopping point about 4-5 times.
- Thread tail of yarn through one of the wraps you just made.
- Secure with a knot and trim excess yarn.